Amazing that it’s been half a decade now since we got the new blade servers that we are running on (got them in June of 2006).
Sadly, 12GB in a server just isn’t what it used to be and the database servers are really starting to feel strained as they beg for more memory. Handling ~25GB of databases on servers with 12GB is just no bueno. I thought of upgrading the RAM in the blades, but the maximum RAM the BIOS supports is 16GB, and all the DIMM slots are in-use… so it more or less would mean tossing all the existing RAM and buying 160GB of new RAM. In the end spending that much money to gain 4GB per server isn’t really worth it (especially since 16GB wouldn’t really be enough either).
I started to do a little research on what would be some good options for upgrades… I think I want to stay away from blades simply because we did have the daughter card in the chassis fail once which took down all 10 blades (the daughter card controls the power buttons). Buying 2 complete sets of blades/chassis is overkill just so you have stuff still up if one complete chassis goes down. The “must haves” on my list are hot swappable drives with hardware RAID, hot swappable redundant power supply, some sort of 10Gbit/sec (or higher) connectivity for communicating between servers. On top of it all, the servers need to be generally “dense” (I don’t want to take an entire rack of space).

PowerEdge C6100
The Dell C6100 actually looked really nice at first glace…
Pros
- Super dense (4 servers in a 2U package)
- Redundant power supplies (hot swap)
- 24 (!!) hot swap drives
- Supports 10GbE or even QDR Infiniband (40Gbit/sec
Cons
- Age – the server itself came out about 18 months ago without any refresh. That means you have hard drive options and CPU options that are a year and a half old
- Price – OMG… a single unit loaded up with 4 nodes, drives, RAM, Infiniband, etc. works out to $54,709 (before tax).
The age factor really becomes an issue when it comes to the disk drives… you can get 15k rpm drives in a 2.5″ form factor, but Dell only offers 146GB models (there are 300GB models now). The CPU isn’t really too bad… Dell’s fastest offering is the Xeon X5670… 2.93Ghz, 6 core @95 watts (wattage is important because of so much stuff crammed in there). There is a slightly faster 95 watt, 6 core processor these days… the Xeon X5675… the same thing basically, just 3.06Ghz. 0.13Ghz speed difference isn’t a huge deal… but the hard drive difference is a big deal.
I started to think… well maybe I could just order it stripped down and then I could just replace the CPU/hard drives with better stuff. Doing that, you still end up spending about $60,000 because you end up with 8 Xeon processors (valued at about $1,500 each that you just are going to throw away).
Then I started to think harder… Wait a minute… Dell doesn’t even make their own motherboards (at least I don’t think so)… so maybe I could find the source of these super dense motherboards and build my own systems (or just find the source of something similar… which ended up being the case).
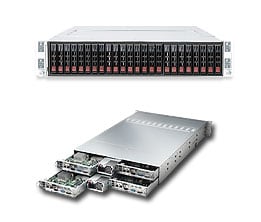
SuperServer 2026TT-H6IBQRF
What do we have here??? The Supermicro SuperServer 2026TT-H6IBQRF is more or less the same thing… 4 servers per 2U, hot swap hard drives, same BIOS/chip/controllers… supports the same Xeon processor family (up to 95 watts)… And as a bonus, Infiniband QDR is built in (it’s a $2,596 add-on for the Dell server) as well as an LSI MegaRAID hardware RAID card (a $2,156 add-on for the Dell server).
So let’s add up the cost to build one of these things with the CPU/hard drives I actually would WANT…
- Chassis (includes 4 motherboards, 2 power supplies, hard drive carriers, etc. – $4,630.98
- Xeon X5675 3.06Ghz CPU – $1,347.84 each, so $10,782.72 for 8
- 8GB ECC/Reg DIMM – $124.26 each, so $5,964.48 for 48
- 600GB Seagate Savvio 10K.5 – $391 each, so $9,384 for 24 (also 410% more capacity, 21% faster and 20% more reliable than the 146GB options from Dell)
Add It All Up…
$30,761.88 would be the total cost (a savings of $24,138.82) and in the end you get slightly faster CPUs and *way* better hard drives. So in a single 2U package, you end up with 48 Xeon cores at 3.06Ghz, 384GB of 1333Mhz memory, 14.4TB of drive space (9.6TB usable after it’s configured as double redundant parity striping with RAID-6… which should be able to do more than 750MB/sec read/write). 8 gigabit ethernet ports and 4 Infiniband QDR (40Gbit) I/O.
Get 2 or 3 of those rigs, and you have some nasty (in a good way) servers that would be gloriously fun to run MySQL Cluster, web servers and whatever else you want.